Diddley Bowing Around
This was my second unit of my STEAM class Light, Sound, and time, this unit was all about sound. In order to understand what sound is we had to learn how we even perceive it in the first place so we learned about the different parts of our ears and how sound travels through them. Afterwards we learned about sound itself, how it travels in longitudinal waves, the speed of sound (and how it can vary), and the different materials it can travel through. We also learned about traveling and standing waves, low pitch, high pitch, low volume, and high volume which are all things that can affect the way we perceive the sound, as well as NOT perceive it in instances when the frequency is either too high or too low for human ears to perceive.
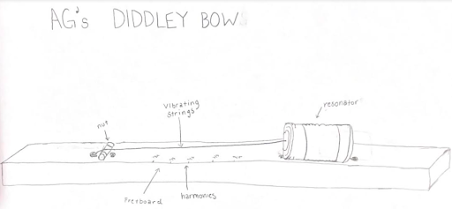
For this project we built a one stringed instrument that resembles a guitar, also known as a diddley bow. By making this we used our understanding of sound such as how it travels and math in order to measure, build, and play around with an instrument that produces musical sounds. We saw the science and physics of sound come alive through our instrument.We were able to hear the sound waves it produced, hear the frequencies and amplitude and even calculate them. Harmonics also came into play when we played different frequencies.
Diddley bow building
How does it produce sound?
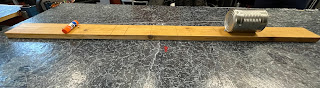
Once I had all my building materials to get started it was time to build. The building process did not take very long, we poked holes into our cans in order for the string to pass through. We then secured the tin can in place with screws and attached the guitar strings to the screws across the wood from each other. I personally took a glue stick to act as the nut of our diddley bow and add more tension to our string. Along with it we added a screw to keep the nut in place. Finally we all measured and marked our harmonics on our diddley bow fret board. Here are my final results:

 Triangle, AAG, 2022
If we turn our diddley bows unto their sides we can see a trapezoid shape come to life, forming from the bottom of our tin can towards our nut (also known as my glue stick ). We can use our measurements of the height, B1, and B2 and use it to calculate the area of our trapezoid shape. Along with the area we are able to calculate the upper angle of our trapezoid using the formula tan^-1 (h/b2-b1), once we had our upper angle (88.211°) we were also able to calculate our lower angle (91.789°). Here are the final results:

Our diddley bows all made different sounds depending on the string we used to make it. A thicker string usually meant a lower bass sound while a thinner string usually meant higher pitch sounds. Of course we know that other factors such as length, tension, and density also affected the sound our diddley bows produced. My specific nickel 0.660 mm string produced sounds like this one:

For this project we built a one stringed instrument that resembles a guitar, also known as a diddley bow. By making this we used our understanding of sound such as how it travels and math in order to measure, build, and play around with an instrument that produces musical sounds. We saw the science and physics of sound come alive through our instrument.We were able to hear the sound waves it produced, hear the frequencies and amplitude and even calculate them. Harmonics also came into play when we played different frequencies.
Diddley bow building
How does it produce sound?
When we pluck the string on the diddley bow it sends vibrations through the body and resonates at the bottom part known as the resonator which amplifies the sound waves that travel to our ears. How we perceive the sound that our diddley bow makes depends on the length, tension, density, and thickness of our string. For my diddley bow I used a semi-flat nickel string with a diameter of 0.026" (0.660mm) meaning it was not the thinnest but also not the thickest string.
Materials used
- Piece of wood
- Metal tin can
- Nickel guitar string (0.660 mm)
- Glue stick
- Screws
- Screwdriver
Diddley Bow Diagram, AAG, 2022
Side View of Diddley bow, AAG, 2022
Top View of Diddley Bow, AAG, 2022
With our diddley bows fully built we were ready to get into the math aspect of this project.
Calculations
Measurements
In order to start on our calculations we first needed to collect our measurements so with a ruler and some measuring tape I measured the basic parts of my diddley bow such as:
Height by battery (b1): 1 in
Height by tin can hole (b2): 1.75 in
Distance from glue stick to front of tin can: 24 in
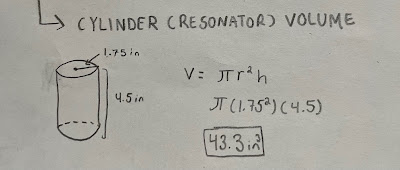
Tin can (cylinder/resonator) radius: 1.75 in
Tin can height: 4.5 in
By using our measurements b1 and b2 as well as the distance from our glue stick to our tin can we would be able to to calculate the length of our vibrating string! Using the Pythagorean theorem (a^2 + b^2 = c^2) on the triangle shape we formed with our measurements (as shown below) gave us the final length of our vibrating string, 24.012 in.
With all our basic measurments down we would be able to calculate our trapezoid and cylinder.
Trapezoid & Cylinder
Trapezoid Calculations, AAG, 2022
Not only could we use our basic measurements to calculate our trapezoid but we could also use them to calculate the volume of our cylinder (resonator) like this:
Cylinder Volume, AAG, 2022
Now with our trapezoid and cylinder calculations done we could move on to the calculations involving the sound (that can be considered music if pleasant to the ears) our diddley bows make!
Wavelength, Harmonics, and Music (kind of)
Of course it can provide different sounds when the wavelength is changed, altering the frequency and if the amplitude was also increased or decreased (higher amplitude= more intense sound) the sound would change which I will further explain next.
Using an online tuner we were able to calculate the open note frequency of each of our diddley bows, my diddley bow had an open note frequency of 100hz. Using this "fundamental" note we can calculate our 2nd, 3rd, and 4th harmonic simply by multiplying the harmonic number by our fundamental frequency, ex. 2 x 100hz = 200 hz (2nd Harmonic). Once we knew the frequency of our harmonics we could also calculate the wavelength! What is wavelength? Wavelength is the distance between the crests of a wave and can be measured in meters. How did we calculate it? we simply took the formula used to calculate wavelength λ = v / f and plugged in our numbers. Our v variable was the speed of sound through air at 20°C, 343 m/s, and our f variable was the frequency in regard to each of the harmonics.
Harmonics, AAG, 2022
As we can see from the diagram above the frequency of our harmonics increased as we went higher up. This in turn alters the sound of our diddley bow depending on the harmonic you play, our highest frequncy being 400hz and our lowest being 100hz. With all our calculations done we had officially completed our diddley bow project.
Conclusion
This project was very fun to make, I definitely recommend everyone try making their own diddley bow when they have 1-2 hours to spare during the weekends. I will admit there are some parts in the building process that may seem difficult such as making sure the string is tense enough to produce desirable sound but in the end it is worth hearing the music and sounds you can produce with your very own homemade instrument. And who knows? you might even start your own diddley bow band and diddle around with them. Good luck and have fun!

Comments
Post a Comment